If you want to know how to create barcode in Shopify, you have two main paths: enter an existing barcode (UPC, EAN, GTIN) directly into your product’s barcode field, or generate a new one using Shopify’s free barcode generator or the built-in Retail Barcode Labels app. Both options take less than five minutes per product once you know where to look.
This guide covers every method — for online-only stores, retail sellers using Shopify POS, and anyone managing inventory across multiple locations.
Quick Summary
To create a barcode in Shopify, go to a product in your admin, scroll to the Inventory section, and enter a barcode number in the Barcode field. If you need to generate barcodes from scratch, use Shopify’s free online barcode generator or the built-in Retail Barcode Labels app. For full retail use, you may need official UPC or EAN codes.
Table of Contents
Why Barcodes Matter for Shopify Stores
Before getting into the steps, here is why barcodes are worth setting up correctly:
- Variant tracking: Each size, color, or material variation can carry its own barcode for precise tracking.
- Inventory accuracy: Barcodes tie each product variant to a unique identifier, making stock counts reliable.
- Faster checkout: Shopify POS reads barcodes directly, reducing manual input and errors at the counter.
- Marketplace requirements: Channels like Google Shopping and Amazon may require valid GTIN, UPC, or EAN codes.
- Warehouse and fulfillment: Labels with barcodes make picking and packing significantly faster.
The Difference Between Internal Barcodes and Official UPC/EAN/GTIN Codes
This is the most commonly misunderstood part of Shopify barcode setup. Here is a clear breakdown:
Internal barcodes are numbers you create yourself — or that Shopify generates for you. They work perfectly inside your own store, on your labels, and with your barcode scanner at a physical counter. However, they are not recognized by external systems like Amazon, large retailers, or global supply chains.
Official barcodes (UPC, EAN, GTIN) are issued by GS1, the global standards organization. They are universally recognized and required if you sell through major retail channels, third-party marketplaces, or wish to distribute products to other businesses.
Practical rule:
- Selling only on your own Shopify store or using Shopify POS for your own retail location? Internal barcodes are fine.
- Selling on Amazon, Google Shopping, or supplying wholesale to retailers? You need official GS1-issued barcodes.

Barcode Methods in Shopify: Comparison Table
| Method | Best For | Pros | Limitations |
|---|---|---|---|
| Enter existing UPC/EAN/GTIN manually | Products with official barcodes | Universally recognized, marketplace-ready | Requires purchasing codes from GS1 |
| Shopify’s free online barcode generator | Quick internal barcodes | Free, fast, no app needed | Not GS1-registered, internal use only |
| Retail Barcode Labels app (built-in) | Printing labels for products | Directly integrated, label templates included | Generates Code-128 only, not GS1-registered |
| Third-party barcode app (e.g., MS Barcode Labels & Generator, Yanet) | Bulk barcode creation, custom labels | Advanced features, bulk generation, custom formats | Some apps have paid plans |
| Import barcodes via CSV | Bulk barcode assignment | Fast for large catalogs | Requires correctly formatted CSV |
How to Create Barcode in Shopify: Step-by-Step
If you’re considering creating a barcode in Shopify there are a few different methods to do so. These are:
Method 1: Add a Barcode Manually to a Product
This is the most direct approach if you already have a barcode number — from a manufacturer, a GS1 purchase, or your own numbering system.
1. Log in to your Shopify admin.
2. Go to Products in the left sidebar.
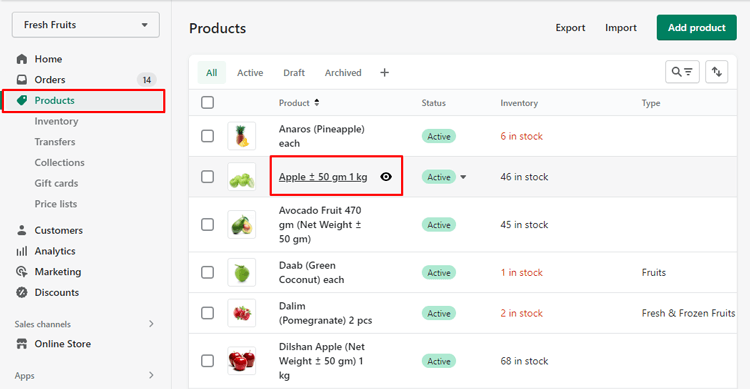
4. Click the product you want to edit.
5. Scroll down to the Inventory section (for single-variant products) or click a specific variant if your product has multiple options like size or color.
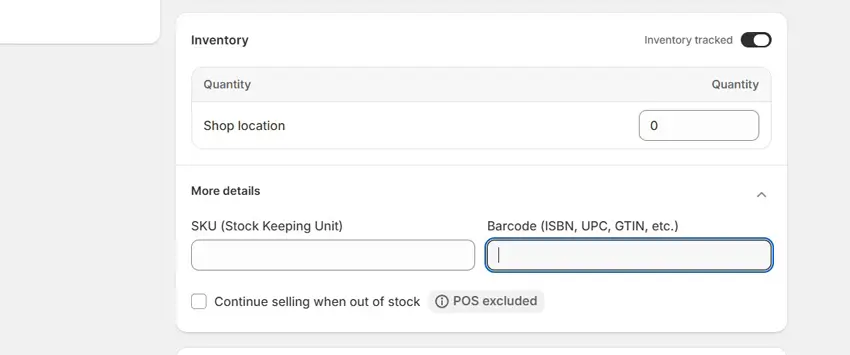
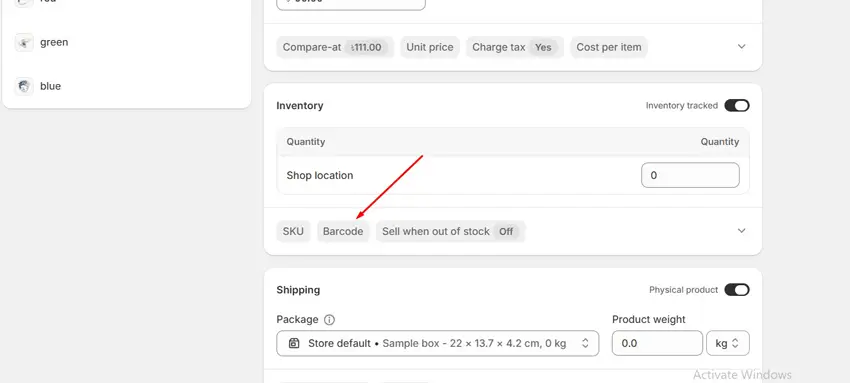
6. Find the Barcode (ISBN, UPC, GTIN, etc.) field.
7. Type or paste the barcode number into the field.
8. Click Save.
Repeat this for each product variant. Every variant should have its own unique barcode — do not reuse the same barcode across multiple products or variants.
Method 2: Use Shopify’s Free Online Barcode Generator
For store owners looking to add barcodes to their inventory, Shopify offers a convenient solution through their free online barcode generator. To create custom barcode labels, you can follow these simple steps:

- Go to Shopify’s free barcode generator tool (shopify.com/tools/barcode-generator).
- Enter your email address.
- Enter the data you want the barcode to represent — typically a product SKU, internal ID, or any unique code.
- Click Submit.
- Shopify will email you a barcode as a PNG file.
- Download the PNG and use it for product labels.
Important note: These are internal barcodes. They are not registered with GS1 and will not work on external marketplaces that require official UPC or EAN codes.
Method 3: Use the Retail Barcode Labels App (Built Into Shopify)
The Retail Barcode Labels app is available directly inside Shopify admin. It generates barcodes based on your variant IDs and lets you design and print label templates without leaving your dashboard.
Step 1: Install the “Retail Barcode Labels App”
Visit the Shopify App Store. Search for “Retail Barcode Labels” and install it if not already installed.

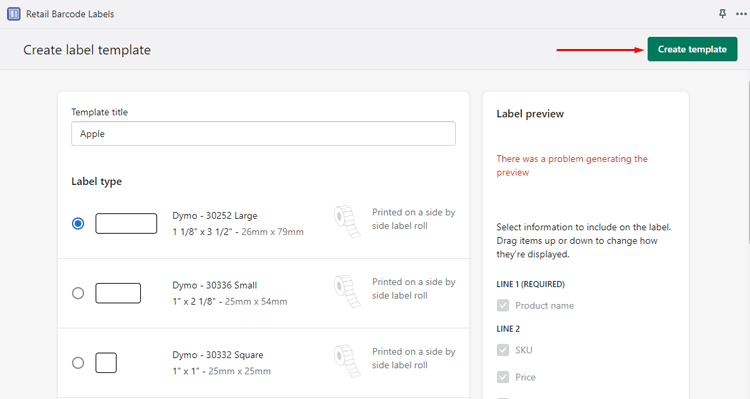
Step 2 — Create a label template:
- Inside the app, click Create template. If this is your first time, click Get started first.
- Enter a template title.
- Select a label type from the Label type section — choose your paper brand (Avery, Dymo, Zebra) and paper code/model number. If you do not have a label printer, select a standard size for regular inkjet or laser printing.
- In the Label preview section, select what information you want on the label — product name, price, SKU, barcode, or any combination. Drag and drop the items to change their order.
- Click Create template to save it.
Step 3 — Generate barcodes for your products:
- Inside the app, click Create barcodes.
- Choose one of two options:
- Create barcodes for products without barcodes — generates barcodes for all products that have no barcode assigned yet.
- Create barcodes for specific products — lets you select individual products or variants to assign barcodes to.
- The app generates 8-digit Code-128 barcodes automatically.
Warning: This feature overwrites any manually entered barcodes for the selected products. If you have manually entered barcode numbers you want to keep, do not use “Create barcodes for products without barcodes” on those products. Instead, only select products that have no barcode yet.
Step 4 — Print barcode labels:
- Go to Products in your Shopify admin.
- Select the products you want labels for.
- Click the … (More actions) button.
- Under the Apps section, click Print barcode labels.
- Choose the label template you created in Step 2.
- Enter the number of labels for each variant.
- Check your printer settings in the Print job section.
- Click Print labels.
You can also save the labels as a PDF if you prefer to print later or send to a print shop.
Note: The Retail Barcode Labels app generates Code-128 format barcodes only. Printing from the app is supported on desktop admin and the Shopify mobile app, but not directly through Shopify POS.
Method 4: Use a Third-Party Barcode App
If you need bulk barcode generation, custom label designs, or specific barcode formats (UPC, EAN, QR), a third-party app gives you more flexibility.
Popular options in the Shopify App Store include:
- MS Barcode Labels & Generator — Supports GTIN, UPC, EAN, and label printing. Rated 4.9 out of 5 stars with over 300 reviews.
- Yanet Retail Barcode Labels — SKU and barcode generator for printing UPC, EAN, and GTIN labels. Rated 4.9 stars with over 400 reviews.
Both are marked “Built for Shopify,” meaning they meet Shopify’s highest standards for performance and integration.
Method 5: Bulk Import Barcodes via CSV
If you have many products and need to assign barcodes to all of them at once, the CSV import method is the most efficient.
- Go to Products in your Shopify admin.
- Click Export to download your current product list as a CSV.
- Open the CSV in a spreadsheet tool.
- Fill in the Variant Barcode column with your barcode numbers.
- Save the CSV.
- Go back to Products and click Import.
- Upload the updated CSV and confirm the import.
Make sure each barcode in the CSV is unique and in the correct format for your use case.
Select a label template and follow the prompts. Make sure to update your printer settings before printing the labels.
This functionality allows Shopify store owners to easily design and print barcode labels for their products, enabling efficient inventory management, accurate tracking, and seamless sales processes.
Recommended Blog for You:
👉 How to Add Drop-Down Menu in Shopify: A Step-by-Step Guide
👉 How to Add Sale Tag on Shopify: A Step-by-Step Guide
👉 How to Add Products to Featured Collection on Shopify: A Step-by-Step Guide
👉 How to Add Products to Collections on Shopify: The Step-By-Step Guide
Before You Start: Barcode Setup Checklist
Run through this before creating or assigning barcodes in your store:
- Your inventory locations in Shopify are set up and linked to the right products
- Each product variant has a unique SKU
- You know whether you need official UPC/EAN/GTIN codes or internal codes
- All barcodes are unique — no two variants share the same barcode
- Your label printer is compatible with Shopify or your chosen app
- You have tested a barcode by scanning it with a barcode scanner
- Your Shopify POS is set up correctly if you run a physical retail location
- If selling on marketplaces, you have verified GTIN requirements for those channels
SKU vs Barcode in Shopify: What Is the Difference?
These two fields are related but serve different purposes:
SKU (Stock Keeping Unit) is your internal product reference number. It is used for managing and identifying products inside your own system. It can be any alphanumeric code you choose.
Barcode is a scannable code — typically a number encoded as a series of lines or a QR pattern — that links to product data when scanned. In Shopify, the barcode field accepts UPC, EAN, GTIN, ISBN, or any internal code you assign.
You can have a SKU without a barcode. But if you want to scan products at a physical counter, print labels, or meet marketplace requirements, you need barcodes filled in.
Barcodes and Shopify POS
If you run a retail store using Shopify POS, barcodes are how your staff scan products at checkout. When a barcode is scanned, Shopify POS pulls up the correct product and variant automatically.
To make this work:
- Every product variant sold in-store needs a barcode entered in the Shopify admin.
- The barcode must be unique — no duplicates across your product catalog.
- Your barcode scanner must be paired and working with Shopify POS.
- Labels printed through the Retail Barcode Labels app can be applied to product packaging and shelf tags.
Note: Label printing through the Retail Barcode Labels app is not directly supported by Shopify POS. Print labels from your desktop admin instead.
Frequently Asked Questions
Can Shopify generate barcodes automatically?
Yes. Shopify’s built-in Retail Barcode Labels app can generate barcodes for products that do not have one assigned. It uses the last 8 digits of the variant ID to create a Code-128 barcode. You can also use Shopify’s free online barcode generator tool to create downloadable barcode images.
Do I need UPC codes for my Shopify store?
Not for running a Shopify online store or Shopify POS on its own. You can use internal barcodes for inventory and in-store scanning. However, if you list products on marketplaces like Amazon, Google Shopping, or want to supply products to other retailers, you will typically need official UPC or EAN codes issued through GS1.
What is the difference between a SKU and a barcode in Shopify?
A SKU is your internal product reference code — text-based, used for stock management. A barcode is a scannable numeric code — used for physical scanning at checkout, label printing, and marketplace product feeds. Both live on the product variant page in Shopify. You can have one without the other.
Can I use the same barcode for multiple Shopify products?
No. Barcodes must be unique per variant. If two products or variants share the same barcode, Shopify POS will pull up the wrong item when scanned, causing inventory errors and checkout mistakes.
How do I print barcode labels in Shopify?
Use the Retail Barcode Labels app inside Shopify admin. Go to Products, select the products you want labels for, click the … menu, choose Print barcode labels under the Apps section, pick a template, set the quantity, and print. You can also save as PDF.
Do Shopify barcodes work with Shopify POS?
Yes. Any barcode entered in the product variant’s barcode field will work with a paired barcode scanner in Shopify POS. When scanned, the system immediately pulls up the correct product and variant. Make sure every in-store variant has a unique barcode assigned.
What barcode format should I use in Shopify?
It depends on your use case. For internal use and Shopify POS, Code-128 (what the Retail Barcode Labels app generates) works well. For selling on global marketplaces, use UPC (12 digits, common in the US) or EAN (13 digits, common internationally). Both are accepted in Shopify’s barcode field.
Are internal barcodes enough for my store?
For a self-contained operation: your own Shopify store, Shopify POS, and your own warehouse, internal barcodes are sufficient. The moment you want to list on Amazon, Google Shopping, or supply a third-party retailer, you will need GS1-registered barcodes.
Where do I add a barcode in Shopify?
To add a barcode to a product in Shopify, go to your product page and scroll down to the “Variant” section. You will see a field called “Barcode” where you can enter the barcode number.
Can I print barcodes directly from Shopify?
Yes, Shopify offers a built-in feature that allows you to print barcode labels directly from the platform.
How do I print barcode labels in Shopify?
To print barcode labels in Shopify, go to the product page and click on “More actions” and select “Print the shipping label.” From there, you can select the barcode label format and print the labels.
Can I customize the appearance of my barcode labels?
Yes, you can easily customize the appearance of your barcode labels by selecting a different label format or by adding your own logo or design to the label.
Get Exclusive Shopify Services from ShopiBuffet
With ShopiBuffet’s exclusive Shopify services, you won’t have to worry about anything when starting and running an online business, which is no easy task. Their team of qualified experts can handle everything from designing a visually attractive theme to setting up your items and sales channels.
Their customer service is also available to assist you whenever you have queries or require direction. Even new business owners may set up a fully functioning eCommerce store and begin selling online with their assistance. Don’t wait to use ShopiBuffet to turn your Shopify store into a reality, it’s simple as pie!
Conclusion
Setting up barcodes in Shopify is straightforward once you know which method fits your situation. If you already have official UPC or EAN codes from a manufacturer or GS1, enter them directly into the barcode field on each product variant. If you are managing inventory for your own store only, Shopify’s built-in Retail Barcode Labels app will generate and print labels without any extra cost.
The most important decision is choosing between internal and official barcodes before you start. Internal barcodes are fast and free but stay within your own system. Official GS1-registered codes cost money but open access to major sales channels.
Start with the barcode checklist above, pick the method that matches your sales channels, and get every variant labeled and scannable before you need it — not after you have already launched or expanded to retail.
If you found this guide useful, check out other Shopify tutorials on ShopiBuffet covering inventory management, product setup, and POS configuration.