

Quick Answer: To automate Shopify returns, turn on self-serve returns, set return rules for windows, fees, and final-sale items, then use Shopify Flow to tag, route, and notify when a return is requested, approved, or closed. Approvals and refunds still happen in your Shopify admin, so keep exceptions under human review.
You can automate Shopify returns by combining three native tools: self-serve return requests, return rules, and Shopify Flow. Together, they handle requests, eligibility checks, notifications, tagging, and routing without a support ticket for every return.
Shopify doesn’t automate the whole process, though. You still approve each request and process the refund yourself, and that’s where human judgment matters most.
This guide shows you how to set up each piece, where Flow fits, and which decisions should stay with a person. It also explains when a Shopify returns app is worth adding.
Can You Automate Shopify Returns?
Yes, partly. Shopify can automate how customers request returns, which items qualify, which emails go out, and what happens inside your store when a return changes status.
Approving a request and issuing the refund are still manual steps in your admin, according to Shopify’s guide to managing self-serve returns.
It helps to think in three levels:
- Partly automated (native Shopify): Customers request returns from their account, return rules block ineligible items, and confirmation emails go out automatically. You approve and refund by hand.
- Highly automated (native Shopify Plus plus Flow): The same setup, plus workflows that tag orders, alert your team, flag risky returns for review, and cancel stale returns.
- Approval automation (usually an app): Rules that approve qualifying requests without a human click. Shopify’s Help Center doesn’t list a built-in auto-approve setting, so this is where third-party apps come in.
What Parts of the Shopify Return Process Can You Automate?
The table below separates what Shopify does on its own from what needs Flow or an app.
| Task | Native Shopify | Needs Flow or an app |
|---|---|---|
| Customer return requests | Yes, through self-serve returns | No |
| Eligibility and return windows | Yes, through return rules | Apps may add more conditions |
| Final-sale items | Yes, by product or collection | No |
| Return reasons | Yes, shown by product category | No |
| Customer emails | Yes: request confirmation, approved, declined | Flow’s internal email is meant for staff |
| Staff alerts | Email notifications | Flow for Slack or custom alerts |
| Order and customer tags | No | Flow |
| Routing for manual review | No | Flow (conditions plus tags) |
| Approving a request | Manual approve or decline | Apps |
| Return labels | Create in Shopify (US and Canada) or upload your own | Apps for other carrier setups |
| Exchanges | You add exchange items when you approve | Apps for customer-initiated exchanges |
| Refunds | You issue them after inspection | Not through Flow’s return triggers |
| Restocking | You pick a restock location when processing | No |
| Closing the return | Closes automatically once every item is processed and restocked | Flow can react when it closes |
| Stale returns | No | Flow template |
The split matters. Everything before approval and everything around the edges can be automated. The decision in the middle is still yours.
How to Automate Shopify Returns Step by Step
Follow these steps in order. Each one builds on the one before it.
Step 1: Define Your Return Policy
Automation enforces rules. It can’t fix vague ones.
Decide these points before you touch a setting:
- How many days customers have to return items
- Which products or collections are final sale
- Who pays for return shipping (free, a flat fee, or the customer)
- Whether you charge a restocking fee
- How you handle damaged or wrong items
- When you offer an exchange or store credit instead of a refund
Write these down. You’ll use them in the next three steps.
Step 2: Configure Shopify Return Rules
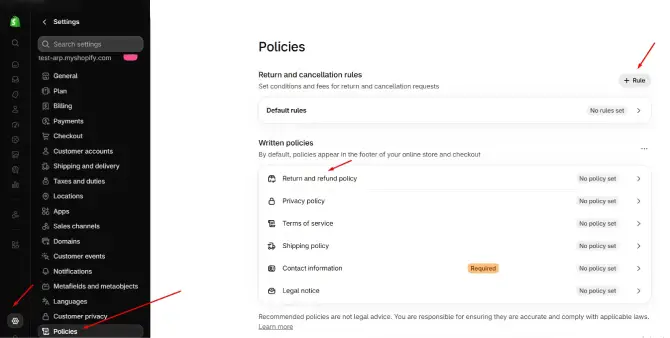
Return rules decide which items a customer can return and what fees apply. Shopify’s return and cancellation rules page covers each option.
- Go to Settings > Policies in your Shopify admin.
- In Return and cancellation rules, open the rule you want to edit.
- Turn on return rules.
- Choose a return window: 14 days, 30 days, 90 days, unlimited, or a custom number of days.
- Choose when the window starts: each item’s delivery, or delivery of the last item in the order.
- Choose return shipping: free, a flat rate, or a label the customer buys.
- Optionally add a restocking fee, final-sale products or collections, and return window overrides.
- Click Save.
A few details save you trouble later:
- Changes apply only to future orders. Orders placed while rules were off keep no time limit.
- Return rules also apply when you create a return manually, even if self-serve returns is off.
- If an item sits in several window overrides, the shortest window wins.
- Return fees aren’t deducted from refunds automatically. You subtract them when you refund.
- If you use Shopify Tax or Tax Platform, tax is calculated on US return shipping fees from October 23, 2026, per Shopify’s documentation.
Selling to the EU? Shopify’s page says EU Directive 2023/2673 requires an electronic way to withdraw, effective June 19, 2026. Review your setup with a legal advisor.
Step 3: Enable Self-Serve Returns
Self-serve returns lets customers start a return without emailing you. Customers need to sign in to customer accounts to use it, per Shopify’s self-serve setup guide.
Where you turn it on depends on your admin:
- Most stores: Go to Settings > Customer accounts, turn on Self-serve returns and cancellations, choose what customers can request, and save.
- Stores with an Order actions section: Use the checkout and accounts editor. This option is in early access. Advanced and Plus stores can also set it by market.
Two requirements are easy to miss:
- Self-serve returns don’t work with legacy customer accounts. Upgrade to the new accounts, or add the customer accounts link to your refund policy, a returns page, or your footer menu.
- Customers can’t request exchanges here. You add exchange items when you approve the request.
The customer journey is simple. They sign in with their email and a six-digit code, pick the order, select items, choose a reason, add a note, and submit.
Each request shows up in your admin. Use the Customer request filter on the Orders page to find requests that need a decision.
Step 4: Configure Return Request Information
The reason a customer picks is your best routing signal. Reasons shown to the customer vary by product category. Apparel, for example, shows options like “Too big” and “Too small.”
The form also includes a note field. Don’t add extra steps on top of it. Every extra field makes returns harder to start.
Shopify’s overview says you can customize the request form to collect details such as return reasons and product condition. The setup guide doesn’t list steps or field options for product condition, so check what your admin offers before you promise customers a condition question. If you can collect it, use it to decide which requests get a closer look.
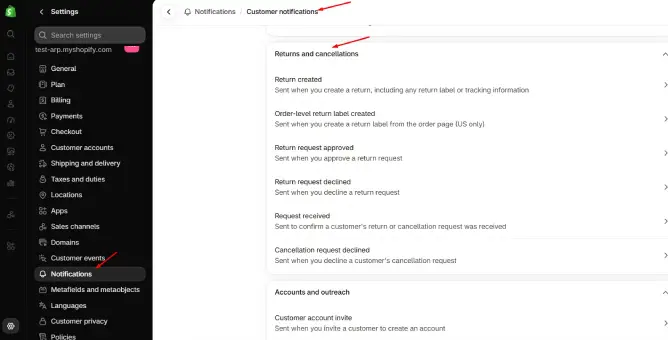
Then review the emails customers receive. In Settings > Notifications > Returns, you can edit the request confirmation, approved, and declined emails.
To get staff alerts, check Staff order notifications. If you receive order emails, you also receive return request emails.
Finally, turn on Use automated policy in your refund policy settings if it’s available. Shopify then updates the written policy when your return rules change.
Step 5: Use Shopify Flow to Automate Return Workflows
Shopify Flow is a free automation app for Basic, Grow, Advanced, and Plus plans. The Send HTTP request action needs Grow or higher.
Flow has triggers for the main return events, according to Shopify’s changelog:
- Return requested
- Return approved
- Return declined
- Return cancelled
- Return closed
- Return reopened
- Return processed (when you process a return in your admin)
- Refund created (an order trigger that fires when an order is partly or fully refunded)
Each trigger passes the return and its order, so you can use order and customer actions such as Add order tags, Add customer tags, and Hold fulfillment order.
Here are practical workflows you can build:
- Tag new requests. Trigger: Return requested. Action: add an order tag like
return-requested. - Alert your team. Trigger: Return requested. Action: send a Slack message or internal email. Shopify offers a Slack template for this.
- Flag high-value returns. Trigger: Return requested. Condition: order total above your limit. Action: add a
manual-reviewtag and notify a manager. - Clean up stale returns. Trigger: Return approved. Use Shopify’s “Cancel inactive returns” template to cancel returns that aren’t refunded or restocked in time.
- Release exchange items. Trigger: Return closed. Use Shopify’s template that releases held exchange items when no balance is owed.
- Close the loop. Trigger: Return closed. Action: add a
return-closedtag for reporting. - Follow up after processing and refunds. Trigger: Return processed or Refund created. Action: add an order tag like
return-processedorrefunded, or notify staff. Shopify’s Refund created page also lists a template that tags high-value returns and prompts staff to contact the customer.
Two cautions:
- Cancelling a return has conditions. Under Shopify’s cancel-return rules, the return can’t be refunded, restocked, or marked as returned; it can’t have a return label, and its fulfillment can’t be cancelled. A cancelled return also can’t be reopened, so the customer has to start a new request. Expect the stale-return template to skip returns where you issued a label, and test it against the way you ship returns.
- Flow’s internal email goes to staff. Customer emails belong in Shopify’s notifications or a marketing tool.
I didn’t find a Flow action that issues refunds or approves requests on the return triggers’ action lists. Check the Flow editor before promising either.
Step 6: Test the Full Journey
Create a test customer account and place a test order. Fulfill it, then request a return from the customer account.
Approve it in your admin, process it, and confirm your Flow tags and alerts fired. Shopify’s trigger pages describe this same test path.
Example Shopify Return Automation Workflow
Here’s how you could automate Shopify returns for a fashion store with a 30-day return policy and a manager who reviews orders over a set amount.
- Customer requests a return. She signs in, selects two items, picks “Too small,” and submits.
- Return rules check eligibility. Only items inside the 30-day window and not marked final sale appear as returnable.
- Shopify sends the confirmation email. Your team also gets a return request notification.
- Flow runs on Return requested. It tags the order. If the total is above your limit, it adds
manual-reviewand alerts the manager. - You review the request. Open the order from the Customer request filter and click Review request.
- You approve. Choose a Shopify label (US and Canada), upload your own, or select no shipping. You can add exchange items here.
- Customer ships the item back. The approved email carries the instructions.
- You inspect the item and process the return. Pick a restock location and choose to refund now or later.
- Shopify closes the return. It closes automatically when every item is processed and restocked.
- Flow runs on Return closed. It adds a
return-closedtag and finishes the workflow.
In short: request > eligibility check > Flow tag and alert > review > approve > inspect > refund or exchange > restock > closed.
What Should You NOT Fully Automate?
When you automate Shopify returns, keep a person in the loop for cases where a wrong call costs money or trust.
- Suspected return fraud. A pattern needs human judgment. Use Flow to flag it, not to decide.
- Very high-value orders. Route them to a manager with a tag.
- Damaged goods. Condition and photos need a human look before refunding.
- Missing items. Shopify lets you remove items that never arrived from a return, which is a manual call.
- Repeated returns from one customer. Review the history first.
- Ambiguous reasons. If the reason doesn’t match the notes, ask.
- Personalized products. Mark them final sale. Shopify doesn’t exempt personalized or digital goods from cancellations automatically.
- Subscription orders. Shopify notes that processing a cancellation request doesn’t cancel the subscription contract. Cancel it separately.
- Market-specific cases. Different regions may need different rules, such as EU withdrawal rights.
A simple test works well: if you’d want a second opinion before refunding, don’t automate the decision.
Native Shopify Returns vs Shopify Returns Apps
App features differ a lot. Treat the right column as a checklist to verify on each app’s listing, not a promise.
| Area | Native Shopify | Third-party returns app |
|---|---|---|
| Self-service requests | Yes, through customer accounts | Varies; some offer their own portal |
| Return eligibility | Window, fees, final sale, product and collection overrides | Varies; some advertise extra conditions |
| Workflow automation | Flow triggers plus a Cancel return action | Varies; some advertise auto-approval rules |
| Branded portal | Pages follow your checkout branding; sign-in required | Varies by app |
| Exchanges | You add exchange items on approval; customers can’t request them | Varies; some support customer-initiated exchanges |
| Carrier integrations | Shopify labels in the US and Canada, or upload your own | Varies by app |
| Complex rules | Product-level overrides; market rules in early access | Varies by app |
| Best for | Small and mid-sized stores with straightforward policies | Stores with complex policies or high volume |
When Do You Need a Shopify Returns App?
Native tools are often enough to automate Shopify returns under a simple policy. Consider an app when you hit a limit you can name.
- Review time is stacking up because every request needs a manual decision
- Customers need to start exchanges themselves
- You ship returns through carriers Shopify labels don’t cover
- You need a branded portal that doesn’t depend on customer accounts
- You need routing logic that conditions in Flow can’t express
- International returns follow different rules by market
Don’t add an app because returns feel messy. Fix the policy first.
What Is the Simplest Return Workflow for a Small Store?
Start with self-serve returns and a clear return window. Add final-sale items, then two Flow workflows: a tag-and-alert on Return requested and the stale-return cleanup.
Approve by hand, refund after inspection, and review the tagged returns weekly. That setup costs nothing beyond your Shopify plan.
How to Make an Automated Return Process Better for Customers
Automation should make returns easier for customers, not harder to find.
- Make the link easy to find. Put the customer accounts link in your refund policy, a returns page, and your footer menu.
- Explain eligibility. Say what’s returnable and for how long.
- Keep the form short. Use the reason and note fields.
- Say what happens next. Cover approval, shipping, and refund.
- Give a refund timeline. Our guide to how long Shopify refunds take can help you word it.
- Use the same wording everywhere. Policy, emails, and FAQ should match.
- Test on mobile. Go through every step on a phone, not just a desktop.
If customers keep asking the same policy questions, a help center can absorb them. HelpMate – FAQ & Help Center is a Shopify app that adds a floating FAQ button to your storefront. It answers questions. It doesn’t process returns.
For wider support habits, see our tips on how to improve customer service.
Common Shopify Return Automation Mistakes
- Automating before the policy is clear. Rules can’t fix a vague policy.
- Hiding the returns link. If customers can’t find it, they email you.
- Approving every exception. Edge cases are where losses happen.
- Forgetting the fee math. Shopify doesn’t deduct return fees from refunds for you.
- Skipping the customer-account setup. Without it, self-serve returns don’t work.
- Never testing the journey. Test as a customer, on mobile too.
- Ignoring return reasons. Tagged reasons show product or sizing problems.
- Trusting outdated instructions. Shopify’s returns settings have changed, so check the current Help Center.
Shopify Returns Automation Checklist
- Return policy written down
- Return rules configured (window, fees, final sale)
- Self-serve returns turned on
- New customer accounts active or account link added
- Returns link added to policy, page, and footer
- Return emails reviewed and edited
- Staff notifications confirmed
- Flow workflows built and tested
- Manual-review conditions defined
- Refund, fee, and restock steps documented
- Full journey tested on desktop and mobile
- Return reasons and tags reviewed regularly
Related guides: how to exchange an item on Shopify if exchanges are part of your policy, and how to refund on Shopify for the manual step.
Frequently Asked Questions
Do customers need an account to request a return on Shopify?
Yes. Self-serve returns require customers to sign in to new customer accounts, using their email and a six-digit code. If you still use legacy accounts, add the customer accounts link to your store.
Can Shopify automatically approve return requests?
Shopify’s Help Center describes approving or declining each request in your admin and doesn’t list a built-in auto-approve setting. Some third-party returns apps advertise auto-approval rules.
Can Shopify automatically issue refunds?
Not as a built-in step. You process the return after inspection and choose to refund now or later. Shopify Flow’s return triggers don’t list a refund action.
Is Shopify Flow free for return workflows?
Yes. Flow is a free app on Basic, Grow, Advanced, and Plus plans. Return triggers such as Return requested and Return closed are available to workflows, though Send HTTP request needs Grow or higher.
Can customers request exchanges through self-serve returns?
No. Customers can’t request exchanges in self-serve returns. You add exchange items yourself when you approve a return request.
Do return rules apply when I create a return manually?
Yes. Shopify says return rules, including restocking fees, still apply to manual returns even when self-serve returns are off. Return fees aren’t deducted from refunds automatically.
Conclusion
To automate Shopify returns well, automate the repetitive work and keep people on the exceptions. Set clear return rules, turn on self-serve returns, and let Flow handle tags, alerts, and cleanup.
Keep approvals and refunds in your hands until you have a reason, and an app, to change that. Start small, test as a customer, and expand once the basics run smoothly.
If you’re improving your post-purchase experience, our guides on refunds and customer service are good next reads.