Have you ever tried to do an exchange on Shopify but found yourself confused and overwhelmed by the process? Don’t worry – we’ve all been there! But thankfully, this how to do an exchange on Shopify step-by-step guide is here to help you out. With just a few simple steps, you will be able to complete the process efficiently and quickly. So, read on for our guide on how to successfully do an exchange on Shopify.
How to Do an Exchange on Shopify
This is a great platform to seek insights on how to do an exchange on Shopify online store.
Here are the steps to make a Shopify Exchange:
Making a Shopify exchange with Edit Order
Edit Order can make the process easier for you if you need to swap Shopify goods, such as changing its size, color, or style. With just a few simple steps, this may be accomplished quickly and efficiently without the need to remove or add any products. Here are the steps of how to do an exchange on Shopify to follow:
Select the order you want to change by going to the Orders area in your Shopify admin.
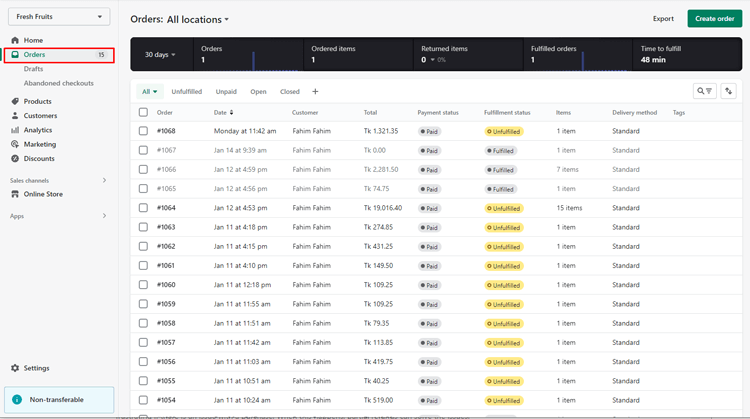
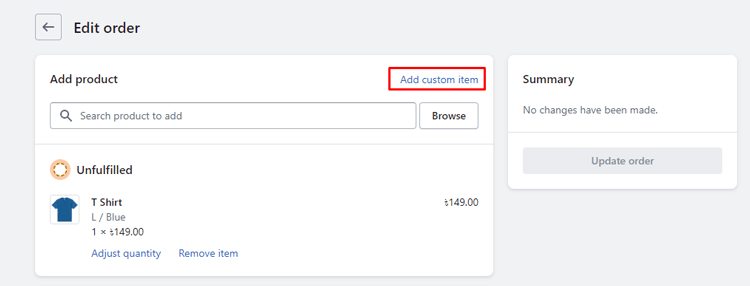
Now go to Edit. Then you will see that the page “Edit Order” will appear.

After that, you’ll be able to add or remove any item you want. So to say, while adding the product, you can browse and add any variant (e.g. size, color) of the particular product depending on their availability.
In addition, you can apply discount to the Ordered product by clicking on “Apply Discount”
You can also add custom item by clicking “Add custom item”.

Recommended Blog for You
👉 How to Add Products to Featured Collection on Shopify: A Step-by-Step Guide
👉 Shopify Tags: What are tags on Shopify, and why are they important?
👉 How to Start a Custom Phone Cases Business with Shopify
How can I use the Shopify POS Pro app to exchange a product?
To make a product exchange in-store, you can use the Shopify POS pro app if you have access to it. Follow these steps within the Shopify pos app to complete the exchange order process:
- Click the icon, then tap Orders.
- Pick the order you want to change.
- Select the item you want to swap by tapping Swap.
- Select the replacement item from the list of available goods.
- Change the selected item’s quantity and, if necessary, add more items.
- If the item needs to be delivered to the customer at a later time, you can mark it as unfulfilled. Doing this will make a new order for the item(s).
- To finish the transaction, tap Refund or Collect if any balance is left. Tap Exchange if there is no balance left.
- Complete the transaction and the procedure.

Tips and Tricks to Improve the Customer Experience When Doing Exchange on Shopify
Here are some tips and tricks to enhance the customer experience when dealing with exchanges on Shopify:
Simplify returns and exchanges:
Make it easy for customers to initiate Shopify returns and exchanges by providing a clear and concise process.
Automate customer service:
Use automated solutions, like chatbots, to respond to clients promptly and effectively.
Gather customer feedback:
Encourage customers to share their exchange order experience feedback to identify improvement areas.
Utilize a customer relationship management (CRM) tool:
A CRM tool can help you manage customer interactions and provide personalized service to build a loyal customer base.
Offer support across multiple channels:
Extend your customer support to various channels, such as phone, email, social media, or live chat, to provide convenience and flexibility to your customers.
Get Exclusive Shopify Services from ShopiBuffet
Starting and managing an eCommerce store can be quite overwhelming. But with ShopiBuffet, the process becomes a whole lot easier. Their team of experts is equipped with the necessary skills and knowledge to help you make an exchange on the Shopify online store while ensuring that all your related activities run smoothly.
They take pride in providing exclusive services, including creating a theme, configuring products, maintaining navigation, and creating sales channels and collections. But that’s not all. ShopiBuffet offers round-the-clock support to their clients, ensuring that your online business only has to run with supervision.
With the help of ShopiBuffet, both beginners and professionals can confidently launch their Shopify store and focus on growing their online business!
Frequently Asked Questions
How do I set up an exchange system on Shopify?
To set up a Shopify exchange system, you’ll need to install an app that provides this feature first. There are several Shopify apps available that offer this functionality. Once you have installed the app, you’ll need to configure the settings and customize the exchange policy for your store.
Can I restrict the items that can be exchanged in my store?
Yes, you can choose which items can be exchanged in your store by configuring the settings within your app. You can also set up rules based on product categories, price ranges, and other criteria.
How do I ensure that the exchanged items are in good condition?
When a customer requests an exchange, you can require them to provide photos or details about the condition of the item they are exchanging. You can also apply specific rules and guidelines for accepting exchanges, such as only accepting exchanges for items that are in new condition.
How do refunds work within an exchange system?
Refunds may be issued as store credit, which the customer can use to purchase other items within your store. Alternatively, they may be issued as a refund back to the original payment method, with the cost of the exchanged item deducted from the refund amount.
Wrapping Up – How to Do an Exchange on Shopify Successfully
In conclusion, carrying out an exchange system on Shopify doesn’t have to be a headache. With Shopify’s user-friendly interface, setting up and configuring the exchange system to meet your business’s needs is a breeze. Whether you allow Shopify returns and exchanges on original orders or across your store, Shopify’s exchange system empowers you and your customers to have a seamless and hassle-free experience.